
 |
| I called the very helpful staff at Just Kampers and ordered all the bits I needed, which was all in stock and they all arrived the next day. |
 |
| Although I cannot fault the Just Kampers service, I could question the overkill on the packaging. |
 |
| My 115ah leisure battery which I purchased from Halfords. I made sure it would fit onto my left hand battery tray by measuring the space available and then measuring the battery. As it turned out it there was more than enough room in the engine bay. |
 |
| My microbus in the Oil Droppers workshop. Stuart is jacking up the front as we need access under the bus for routing the exhaust flue and fresh air intake pipes. Stuart is currently carrying out a lot of work on the twin slider bay (pictured). |
 |
| First thing to do was lay out all the pieces of kit I had bought so we knew what we had and could plan as to what went where, how we were going to do things and in what order. |
 |
| Regular readers will know that I have just made a new buddy seat, which will house the heater. Although this would not only give me more room in the bus but it would also direct the heat into the bus better, however the smaller buddy seat did mean that the location of the heater was compromised. Stuart measured where the chassis was in relation to the inside of the buddy seat and after measuring the exhaust and fresh air pipes on the heater he said if we do it right we could have the exhaust flue on one side of the chassis rail and the fresh air intake on the other side. Stuart measured and re-measured the distances before drilling the pilot hole in my bus floor. Once he was confident the holes would clear the chassis rail, he used a mandrel drill to create two 40mm holes. |
 |
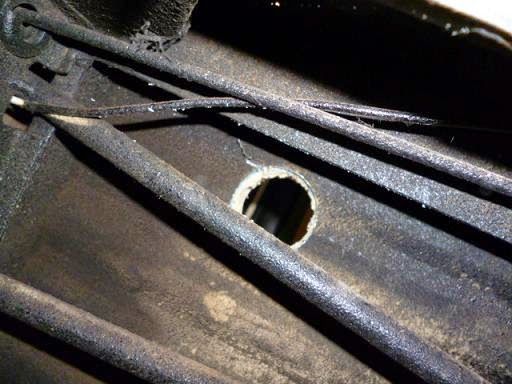
| Lovely nice neat hole cut in my floor. You can see how close it was to the chassis rail. This hole, on the outside of the chassis rail will be for the exhaust flue and will we have the fresh air intake pipe on the inside of the chassis rail. |
 |
| You can see in this photo both holes cut either side of the chassis rail. If your going to attempt this, measure, and re-measure several times to make sure everything will be OK and that you have clearance under the bus. |
 |
| The fresh air intake hole on the opposite side of the chassis rail. |
 |
| Stuart working hard ensuring there will be enough clearance for the pipework. |
 |
| Pipework in position with 'jubliee clips' fitted. We did cut away the flooring before the final installation of the heater as advised in the instructions that came with the kit. |
 |
| The exhaust flue (silver pipe) and the fresh air intake pipe (black pipe) both exiting the bus either side of the chassis rail, this should eliminate the chance of the exhaust gasses being sucked up into the fresh air intake pipe. This photo also shows the gas pipe in place. We decided to route the gas pipe under the bus as I will be building a new cooker / storage unit inside and didn't want the hassle of working around the gas pipe as this could compromise the design of the new unit. |
 |
| With the heater location and exhaust pipes all sorted the next thing to do was to wire in the thermostat, this meant taking it apart to connect the wires to the correct terminals inside the unit. |
 |
| Stuart drilling a hole in my new buddy seat to enable us to route the wires from the heater to the thermostat. |
 |
| The 2 wires from the propex heater (for power and to the thermostat) came with 2 pin & 5 pin connectors respectively and clear to read instructions so connection to the heater unit was straight forward. Both cables exit the heater on the front of the unit, and both exit the buddy seat in the back corner and then the thermostat cable runs straight up the 'B' post to the thermostat. We were going to route both wires under the hot air pipe, and straight out of the buddy seat but as it comes with so much cable, and, as we didn't really know how hot the heat pipe gets we decided to route both cables around the back of the heater. I will tidy the wiring up at a later date. As the heater only needs 25mm clearance from the sides of the buddy seat to the sides of the heater unit to aid ventilation, I will make a false floor to go above the heater unit to give me back some storage space at a later date. |
 |
| I made a small box up to mount the thermostat. This box will enable the power wires from the heater to run up the side of the bus, and into the box and exit out the front on the box and into the back of the thermostat which will be mounted to this box. |
 |
| The location of the thermostat required some thought as this is how the heater unit is turned on and off. As I use my bus all year round I will be using the heater quite a lot in the colder months which means the thermostat needs to be accessible. I did think of putting the unit on the wardrobe but that meant if I was driving and wanted to switch the heat on or off, I would have to get in the back to access the thermostat, and as I don't have a walk-through model bus this would mean stopping the bus and getting out and walking round to the sliding door. So I decided to put it on the 'B' post just behind my head when I'm sat in the driving seat so I could reach it whilst driving. I don't know if this is the optimum location for the thermostat, only time will tell that, but if if isn't, I can always move it at a later date due to the excess cable supplied that we didn't cut down. |
 |
| This photo show the fresh air intake pipe in its final location. Stuart secured this pipe with cable ties through existing holes in the chassis which meant we didn't have to drill any new holes. |
 |
| On the opposite side of the chassis is the exhaust flue pipe which was secured in place using the 'P' clips provided in the kit. You can also see the flexi gas pipe wrapped round the main heat pipe. |
 |
| The flexi gas pipe that goes into the cooker unit is attached to the copper pipe from the heater. We were going to route the flexi pipe above the main hot air pipe on the bus but it looked a bit tight so we opted to route it underneath. While it doesn't look as tidy this way it is still tucked up out of the way. |
 |
| With the heater in position and wired up, it was time to get power into the bus via a auxiliary fuse box mounted under the buddy seat. This location would also house my 1000w (2000w max) pure sine wave power inverter. |
 |
| The wires from the heater are routed from the buddy seat, along the edge of the floor down the side of the bus and enter the space under the rock and roll bed and up to the fuse box. Power to the inverter will be directly from the battery and this will also power the fuse box. I have also fitted a cigarette lighter in the buddy seat so I can charge my phone / camera etc and when I wire this up the wires will follow Stuarts wiring from the heater to the fuse box. |
 |
| A close up look of how the wires enter the base of the rock and roll bed. This is where I will also feed the wires from the cigarette lead up to the new fuse box. |
 |
| Once all the interior work had been completed, now it's time to fit the split charge relay and leisure battery. Stuart is seen here taking the wire from the split charge relay to the alternator. |
 |
| Leisure battery in position. You can see the red power wire from the fuse box entering the engine bay. All Stuart has to do is to connect both battery terminals. |
 |
| The relay in position. I must say that the wiring in the photo is not Stuarts. This spaghetti mess is the original wiring providing power to my rear lights and reversing lights. I know it doesn't look very pretty, but everything works so I'm reluctant to start messing with it. |
 |
| The leisure battery all wired up nice and neat with new battery terminals. Now this is the standard of Stuarts wiring. Volkswagen should take note. |
 |
| Stuarts wiring from the relay to the alternator all nice and neat which is in stark contrast to the rest of the wiring throughout the bus! |
 |
| My interior all back to together. The only tell tale signs of the work which has been carried out is the vents in the buddy seat and the thermostat on the 'B' post. We of course did fire up the propex heater in the Oil Droppers workshop just to test it, and after about 3/4 minutes the interior of my bus was like a sauna. I just have wait and see if the thermostat is in the right place or whether it will need moving and I'll have to see how long the gas bottle lasts, but apart from that I'm very happy. I have been thinking about this installation for a while now and it's so nice to finally have it completed. Maybe now I can start thinking about painting my bus... or maybe not. So that was the Installation of my propex heater, Leisure Battery, auxiliary fuse box, split charge relay and leisure battery. which I'm sure I'll use throughout the year. Many thanks to Stuart Munro at Oil Droppers for spending the Bank Holiday Monday working on my bus and for doing such a good job. |
Hi I've hot one of these in my van , it's not connected up to the gas though, does your flexibility just jubilee clip onto the copper pipe? Does the other end connect to a standard 4.5kg bottle via a regulator? Cheers scott
ReplyDeleteHi Scott, Yes the rubber flexi hose connects to the copper pipe with a jubilee clip, although you could just connect the rubber hose to the heater. The other end of the rubber flex pipe fits onto a regulator, on the gas bottle and again secured by a jubilee clip. Hope this helps. Dave
ReplyDeleteLovely thanks dave, will get it connected up now the colder nights are coming , I also read there is a timer you can get for these, looks a good idea!
ReplyDeleteIt’s too informative blog and I am getting conglomerations of info’s about Inverters .Thanks for sharing, I would like to see your updates regularly so keep blogging.
ReplyDeleteInverters in Chennai
Thank you Andry. I am glad you liked my blog.
ReplyDeleteLovely thanks dave, will get it connected up now the colder nights are coming , I also read there is a timer you can get for these, looks a good idea!
ReplyDeletebattery test chamber
After reading your article I was amazed. I know that you explain it very well. And I hope that other readers will also experience how I feel after reading your article. UL 2580
ReplyDeleteNice knowledge gaining article. This post is really the best on this valuable topic. ithium battery safety tester manufacturer
ReplyDeleteSuperbly written article, if only all bloggers offered the same content as you, the internet would be a far better place.. ithium battery safety tester manufacturer
ReplyDeletethanks this is good blog. UL 1642 Lithium Battery Test Chamber Manufacturer
ReplyDeleteYes i am totally agreed with this article and i just want say that this article is very nice and very informative article.I will make sure to be reading your blog more. You made a good point but I can't help but wonder, what about the other side? !!!!!!THANKS!!!!!! UL 1642 Lithium Battery Test Chamber Manufacturer
ReplyDeleteVery informative post! There is a lot of information here that can help any business get started with a successful social networking campaign. UN 38.3 battery test
ReplyDeleteKat kaloriferi ve kalorifer kazanı ürünlerinin imalat ve pazarlamasını yapan Mimsan Kazan firması üretimde son teknoloji ürünü makine ve ekipmanlar kullanıyor. Türkiye ve dünyanın bir çok ülkesine Mimsan Kazan tarafından kalorifer sistemleri, yan ürünleri ve yedek parçaları ihraç edilmektedir. kalorifer kazanı
ReplyDeleteI would like to say that this blog really convinced me to do it! Thanks, very good post.Room Heaters
ReplyDeleteI have perused your article, it is exceptionally enlightening and helpful for me.I respect the profitable information you offer in your articles. Thanks for posting it.LEISURE
ReplyDeleteInteresting and motivating. Saunas are helpful. Want a lot more facts. saunajournal.com
ReplyDelete